Copyright Bonus 2006. All rights reserved.


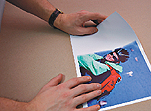
1 Using the enclosed photographic paper for ink printers we print a selected photo or graphic design. We can also use an existing page from a calendar or poster. The important fact is for the graphic design to be larger than the planned size of the pad. It is also recommended prior to the final printing to perform trial print outs on normal pieces of paper in order to check whether our graphic material is of the required size and whether the quality is good and that there are no flaws.
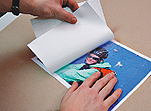
2 The ready printout is then secured by a special type of structural foil, which comes with the set. This will ensure durability and resistance to mechanical deterioration of the surface of the pad. The application of the protective foil has to be done very carefully, so that no air bubbles are trapped between the photo and the plastic foil. The laminating process itself should be done as follows:
- Start from tearing off the narrow piece of paper protecting the glue.
- Place the foil with the side which is PROTECTED by the paper facing towards the surface of the photo, ensuring that the part with the torn off narrow piece of paper does not stick to the photo itself.
- After setting the foil correctly we press the part with the adhesive side against the photo ensuring that we press the foil correctly.
- We place the foil against the whole surface of the photo tearing off piece by piece the protective paper. We expose the surface with the adhesive in fragments of about 2-3 cm and then press the foil against the surface of the photo centimetre by centimetre. The laminating is conducted in such a way so as to ensure that any existing air bubbles be pressed out towards the sides which have not been connected with the foil yet. We laminate the photo until we cover the whole surface.
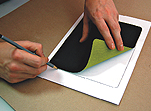
3 The photo covered with the foils is then placed against the enclosed foam (at this point please do not remove the paper which protects the adhesive surface on the foam and do not cut off any unnecessary fragments of the photo).
Placing the foam and photo towards a strong source of light we set the place where we will glue the foam. After setting the foam against the photo we mark out its outline on the under side of the printout (unprinted side).
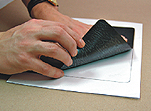
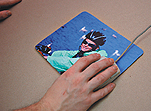
4 The next step is gluing the foam together with the photo. The photo is placed on a flat surface facing downward with the printed side, then we tear off a narrow piece of protective paper and glue it to the photo starting from the spot marked as the edge of the pad. Then we slowly tear off the remaining pieces of protective paper on the foam and carefully glue the two parts together ensuring that no air bubbles are trapped between the foam and the foil.
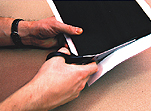
5 Using a sharp cutting tool or scissors we cut off the unnecessary parts of the photo. This way we finish making the personalised mouse pad "FotoMysz - PhotoMouse".
In order to prepare a single
"FotoMysz - PhotoMouse"
pad the following steps
have to be taken:
We hope that the mouse pad will meet you
requirements and that you will be satisfied
with using our product.
Package contains:
- photopaper
- lamination foil
- mousse pad
News: